Skip to content
Calcipedia
Concrete Reinforcing Mesh Calculator instructional illustration

Concrete Reinforcing Mesh Calculator

Estimate welded wire mesh sheets or rolls for a concrete slab with overlap, double-layer ordering, waste allowance, layout checks, coverage efficiency.

Last updated

Reinforcing mesh layout estimate Estimate welded wire reinforcing mesh sheet or roll count, overlap-adjusted layout, total mesh units for single or double-layer slabs, purchased area, and optional material cost.

Job examples

Reinforcement layers

Sheets to order

7 sheets

Waste-adjusted welded wire mesh order count for one reinforcement layer over a 600.00 ft² slab, with overlap already applied to sheet layout coverage.

Base sheets per layer
6
Total base sheets
6
Waste and contingency sheets
1
Coverage efficiency
53.57%
Procurement checkValue
Sheets along length2
Sheets along width3
Coverage length39.50 ft
Coverage width23.00 ft
Overrun beyond slab9.50 ft × 3.00 ft
Single-sheet area160.00 ft²
Purchased mesh area1,120.00 ft²
Estimated material costAdd a sheet price

How to use this result

Use the per-layer base count to sketch the panel or roll layout, the total base count to understand whether a double mesh slab changes ordering materially, and the waste-adjusted order count for purchasing. The coverage length, coverage width, and overrun row help you compare alternative mesh sheet or roll sizes before you commit to a supplier.

This calculator is intentionally procurement-focused. It uses the overlap distance you enter, but it does not set welded wire reinforcement style, lap splice rules, support spacing, slab thickness, or placement depth. Final mesh specification, chairs or spacers, and placement details should still come from the structural drawings and project requirements.

← All Concrete & Masonry calculators

Welded Wire Mesh Planning

Concrete reinforcing mesh sheet count, double-layer ordering, and overlap planning for

A concrete reinforcing mesh calculator helps you estimate how many welded wire mesh sheets or rolls a slab needs before you order material or compare suppliers. This page combines slab dimensions, mesh panel or roll size, overlap distance, reinforcement layers, waste allowance, and optional unit price so you can move from a rough concrete slab mesh estimate to a practical order quantity with clearer layout checks.

What this reinforcing mesh calculator is estimating

Mesh ordering often goes wrong when the slab area is measured accurately but the overlap between sheets is ignored. Even when the slab face is a simple rectangle, each lap reduces the effective added coverage of the next sheet, which means a concrete mesh calculator needs to think in layout rows and columns rather than in area alone.

This page is designed as a procurement and planning aid for welded wire reinforcement in rectangular slabs-on-ground. It estimates how many mesh sheets fit along slab length and slab width, scales the result for a single or double layer, applies waste after the base layout is known, and returns purchased mesh area plus cost if you enter a price per sheet.

Core mesh layout formulas

The calculator first solves the slab area and the area of one mesh sheet. It then works out the number of sheets needed along each slab direction using the entered overlap allowance, multiplies those counts into a per-layer layout quantity, scales that quantity by the number of reinforcement layers, and finally applies waste to reach the order quantity.

Slab area = Slab length x Slab width

The slab face is the base area to be reinforced.

Sheets along a direction = 1 + ceil((Span - Sheet size) / (Sheet size - Overlap))

After the first sheet, each additional sheet adds only its size minus the overlap distance.

Base sheets per layer = Sheets along length x Sheets along width

This is the physical layout count for one mesh mat.

Total base sheets = Base sheets per layer x Reinforcement layers

A double-layer slab simply doubles the per-layer layout before waste is added.

Order quantity = ceil(Total base sheets x (1 + Waste%))

Waste is added after the total layout to allow for cuts, damage, and handling loss.

Coverage efficiency = (Slab area x Reinforcement layers) / Purchased mesh area

This shows how much of the purchased mesh is doing useful slab coverage rather than being consumed by overlap, off-cuts, and contingency.

Single-layer versus double-layer mesh ordering

Many competing mesh estimators stop at a single-layer slab, but real jobs can use one welded wire mesh mat or two. That matters because the physical layout of each layer may be identical while the purchase quantity is very different. A single layer may be enough for one slab detail, while another drawing may call for a top and bottom mat. Treat those as separate ordering cases rather than guessing a blanket percentage uplift.

For example, a 30 ft by 20 ft slab using 8 ft by 20 ft sheets with a 0.5 ft overlap lays out as 2 sheets along the length and 3 along the width, or 6 sheets per layer. With a single layer and 10% waste, you would order 7 sheets. With a double layer under the same assumptions, the same slab becomes 12 base sheets and 14 ordered sheets.

Sheet mesh versus roll mesh takeoffs

Some competitors and suppliers frame the takeoff around rebar, sheet mesh, and roll mesh in one place. This calculator keeps the focus on welded wire reinforcement but now lets the same layout math handle common sheet sizes and long roll sizes. The result wording changes to sheets or rolls so the order quantity stays aligned with the product you are comparing.

Roll mesh can be efficient for long narrow strips, driveways, paths, and staging areas where the roll width matches the slab width. Sheet mesh can be easier to handle, stack, and place on smaller slabs or where the reinforcement must be cut around edges and openings. The best procurement choice is not only the cheapest unit price; it is the product size that reduces overlap loss, overrun, handling waste, and awkward cuts.

  • Use a sheet preset when the supplier sells flat welded wire reinforcement panels or mats.
  • Use a roll preset when the product is supplied as a long roll with a fixed width and roll length.
  • Compare purchased mesh area and coverage efficiency when two products produce similar order counts.
  • Keep the overlap distance tied to the drawing, specification, or supplier detail rather than guessing from product type alone.

Using job examples without losing control of the takeoff

The job examples are shortcuts, not hidden assumptions. A garage slab example sets a common rectangular slab and one mesh layer, a driveway strip example switches to roll mesh, and a heavy-duty pad example uses two reinforcement layers. After selecting an example, you can still change every slab dimension, product size, overlap, waste allowance, and price field.

That workflow is useful when you are comparing suppliers because it gives you a realistic starting point immediately, then lets you test whether a different mesh sheet size or roll size reduces the order count. It also keeps unit choice before the dimensions so metric and imperial takeoffs do not silently mix product sizes.

Overlap, overrun, and why sheet size still matters

Two mesh options can cover the same slab and still produce very different ordering outcomes. The main reasons are overlap and overrun. Overlap reduces the effective added coverage of each new sheet. Overrun is the amount by which the chosen sheet layout extends past the slab dimensions after those overlaps are applied. Both affect cutting, handling, and the amount of purchased mesh that never becomes useful in-place coverage.

That is why the coverage length, coverage width, overrun, and coverage-efficiency outputs are useful. They help you compare panel sizes instead of looking only at total sheet count. A layout with the same sheet count but less overrun can be easier to stage, cut, and price, especially on slabs where access or waste handling matters.

How to use the result on a supplier comparison

Use the base sheets per layer to sketch the layout, use total base sheets to understand the actual reinforcement quantity before contingency, and use the waste-adjusted order count for pricing. If two suppliers offer different stock sizes, compare the purchased mesh area and coverage efficiency rather than judging by price per sheet alone. A cheaper sheet can still create a worse order if the layout produces more overrun and more off-cuts.

The optional price field is best treated as a first-pass material check. It helps you compare sheet-size scenarios and supplier quotes quickly, but it does not include tying wire, chairs or spacers, freight, crane handling, or labor to cut around openings and edges.

Placement and support checks before the pour

A welded wire mesh sheet count is only one part of slab reinforcement planning. Placement matters. ACI and WRI guidance both stress that welded wire reinforcement should be supported in position before concrete placement rather than thrown on grade and pulled up later. If the mat is not held where the drawings intend it to be, a correct order quantity can still produce poor slab performance.

That is also why double-layer work deserves extra care. Two-layer slabs can need separate upper and lower support strategies, and the lower layer still needs enough cover and support to stay where it belongs during placement. The calculator does not model chairs, spacers, or support spacing; it only makes that missing scope more obvious so it does not get mistaken for finished reinforcement detailing.

When welded wire mesh may not be enough by itself

Some slab details use welded wire reinforcement mainly for shrinkage and crack-control duties, while others use rebar, dowels, thicker sections, or more detailed structural reinforcement because the slab sees heavier loads, joint requirements, or design-specific reinforcement demands. If a competitor page makes mesh look like a one-size-fits-all answer, treat that as a warning sign rather than as a convenience.

Use this concrete slab mesh calculator to estimate sheet quantities, not to decide whether mesh is structurally appropriate. If the slab is load-critical, suspended, highly jointed, irregular, or specified with multiple reinforcement types, the engineer's drawings and reinforcement schedule control the final answer.

What this result does not cover

This calculator is not a structural reinforcement design tool. It does not determine welded wire style, wire diameter, slab thickness, reinforcement elevation, load path, development requirements, or the governing lap splice that applies to your project. It also assumes the slab is rectangular and that the overlap can be represented by one consistent distance in both directions.

Use it to plan sheet count and purchasing, then confirm the final reinforcement type, lap splice detail, support spacing, cover, and placement requirements from the structural drawings and project specification before installation.

Frequently asked questions

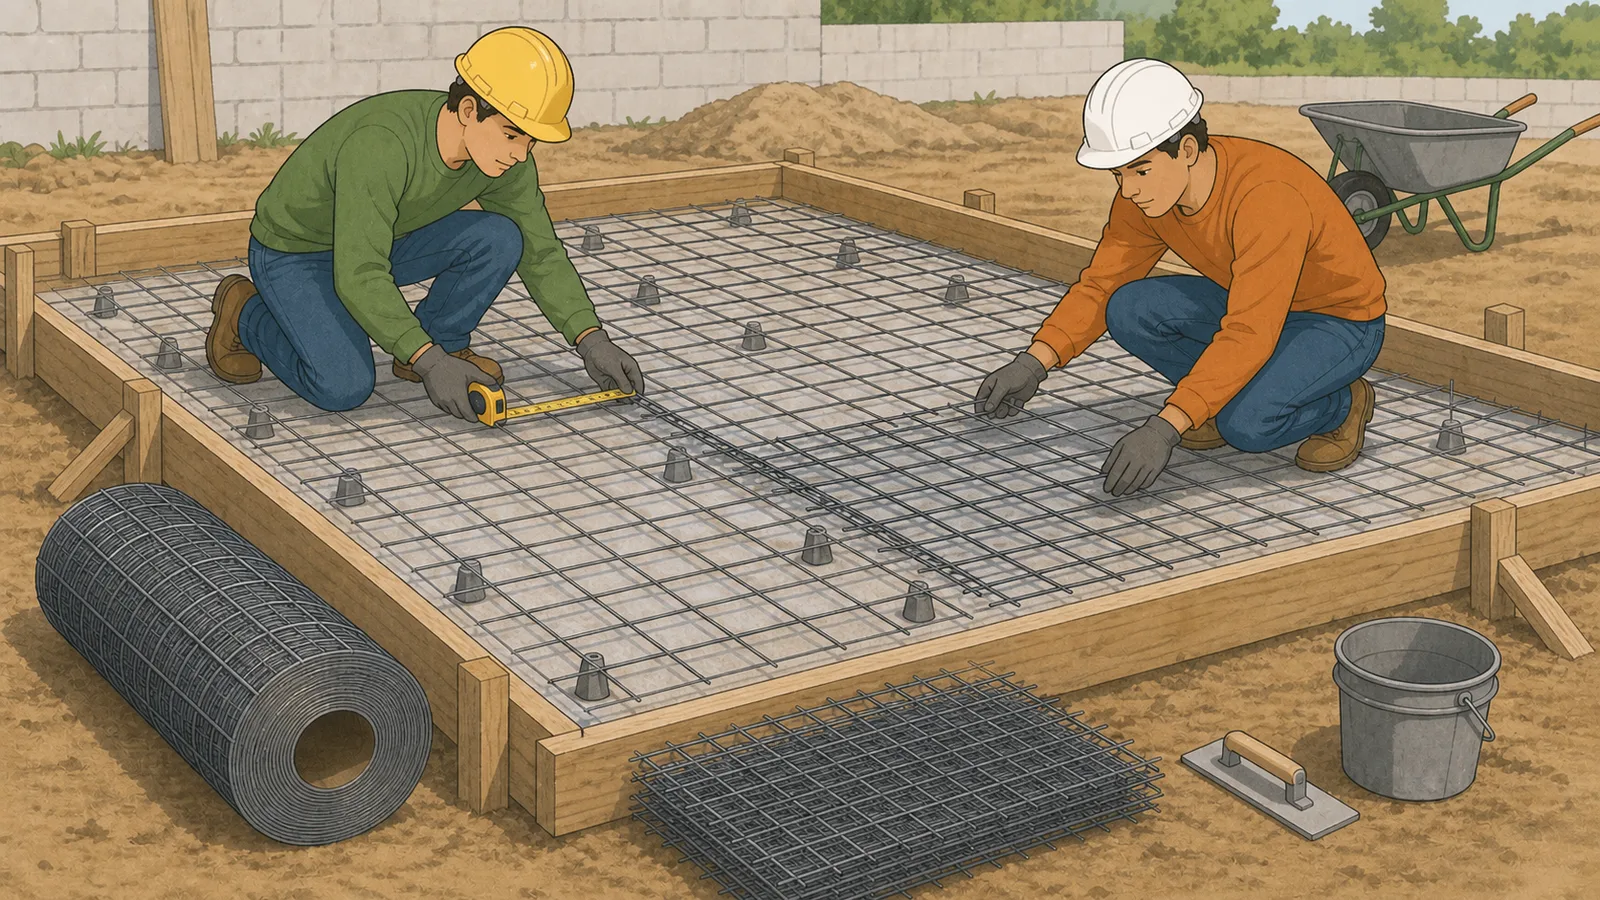
How many sheets of reinforcing mesh do I need for a concrete slab?

You need the slab dimensions, the mesh sheet size, the overlap distance, and the number of reinforcement layers. A concrete reinforcing mesh calculator uses those values to estimate how many sheets fit along each slab direction, then adds waste to reach a practical order quantity.

Why does overlap change the welded wire mesh sheet count?

Because every overlap reduces the extra coverage that the next sheet contributes. If you ignore lap distance, a simple area estimate can under-order welded wire mesh even when the slab area itself is correct.

Can I use this welded wire mesh calculator for double-layer slabs?

Yes. Choose a double-layer layout when the drawings call for two mats. The calculator multiplies the base sheet layout by two before adding waste so the order quantity matches the actual layer count.

What overlap should I enter for concrete reinforcing mesh?

Enter the actual lap distance from the drawings, specification, or supplier detail. Many slab-on-ground details use a common lap reference such as one mesh square plus 2 inches for plain welded wire reinforcement, but that is not universal and should not be guessed if the project documents say otherwise.

Does a concrete mesh calculator replace a structural design or bar schedule?

No. It is a sheet-count and layout aid only. Final mesh type, lap requirements, support chairs, cover, and structural detailing must come from the project drawings and engineering requirements.

Is welded wire mesh the same as rebar for every slab?

No. Some slabs use welded wire reinforcement mainly for crack control, while others need rebar, dowels, thicker sections, or more detailed structural reinforcement. The correct reinforcement system depends on the design intent and loading, not just on slab area.

Why does the calculator show overrun beyond the slab dimensions?

Because rectangular sheet layouts rarely stop exactly at the slab edge after overlap is applied. The overrun output helps you see how much extra mesh the chosen panel size creates, which is useful when comparing supplier sheet sizes or estimating cuts.

Does the price estimate include spacers, tying wire, and labor?

No. The price output is a sheet-material estimate only. It does not include chairs or spacers, tying wire, delivery, cutting labor, or any reinforcement accessories needed to place the mesh correctly.

Can I use this for roll mesh instead of sheet mesh?

Yes. Choose a roll preset or enter the roll length and roll width manually, then use the overlap distance from the drawing, specification, or supplier detail. The math is still based on layout coverage, but handling, flattening, and installation behavior for rolls can differ from prefabricated sheet mats.

Is sheet mesh or roll mesh better for a slab?

It depends on slab shape, product size, access, and handling. Roll mesh can work well for long narrow areas if the roll width suits the slab, while sheet mesh can be easier to stage and place on smaller rectangular slabs. Compare order count, purchased area, overrun, and coverage efficiency rather than choosing by unit price alone.

Why does the calculator start with a garage slab example?

A realistic default makes the calculator useful immediately and gives you a quick reference for the formulas. You can switch to the driveway strip or double-layer pad examples, or overwrite every field with your own slab dimensions and supplier mesh size.

What if the slab is not a simple rectangle?

Break the job into separate rectangular areas, estimate them individually, and then add a project-specific waste allowance for cuts and irregular edges. A single rectangular slab result is usually not reliable for irregular footprints, openings, or complex pour boundaries.

Also in Concrete & Masonry

Related

More from nearby categories

These related calculators come from the same leaf category, nearby sibling categories, or the same top-level topic.